Using the MWL120 System to Find the Angle of (Mis)Orientation Across a Grain Boundary in a Single Crystal Casting
The Find Misorientation tool quickly calculates the composite misorientation angle about three orthogonal axes (x, y and z) of two cubic crystalline grains. Typically, the routine requires a 10 second data collection time for each X-ray image. In most cases, NorthStar's Autodetect Points feature can accurately detect and index the diffraction points.
NorthStar then displays the composite angle of misorientation, as well as more detailed information for each axis. The user can then enter a job number and sample number, and this report can be saved to a file and/or printed to paper.
Video Demonstration
4-Step Walkthrough
Step 1
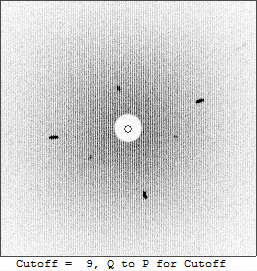
Mount the crystal sample at a film-to-specimen distance of 125mm. For 11 kV operation of a Tungsten X-ray tube, only Miller indices up through 5 are needed in the parameters box. Load indexing file turbine4.idx which contains a short table of starting angles between the following 7 types of planes {100, 110, 111, 210, 211, 311, 331}.
Real-Time
![]() mode is useful during this step.
mode is useful during this step.
Step 2
Enter a Collect Time of 10 seconds in Sample Parameters,
then Collect
![]() an image. The number keys (0-9 on the keyboard) can be used to enhance the visibility of
the diffraction points.
an image. The number keys (0-9 on the keyboard) can be used to enhance the visibility of
the diffraction points.
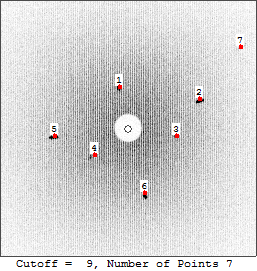
Use Autodetect Points
![]() to automatically find and select the Laue spots. Points can be manually added or removed
if the Auto Detect Points routine happens to under- or over-detect.
to automatically find and select the Laue spots. Points can be manually added or removed
if the Auto Detect Points routine happens to under- or over-detect.
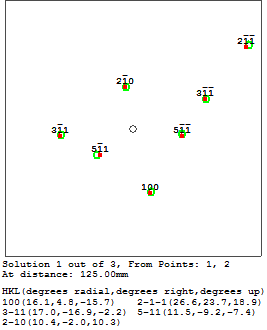
Now use Find HKL
![]() to determine the orientation of the crystal at the current location.
to determine the orientation of the crystal at the current location.
We want NorthStar to remember this information so we can compare it against the
orientation of the crystal on the other side of the grain boundary. Click
Store Orientation 1
![]() .
.
Example Images
|
|
Collected Image of
Boundry Side 1 |
|---|
|
|
7 Diffraction Points
(Laue Spots) Selected |
|---|
|
|
The Selected Points
are Indexed |
|---|
Step 3
Initiate Real-Time
![]() mode, then use the joystick to translate the crystal until it moves across the grain
boundary. You should see the Laue spots shift in the real-time image.
mode, then use the joystick to translate the crystal until it moves across the grain
boundary. You should see the Laue spots shift in the real-time image.
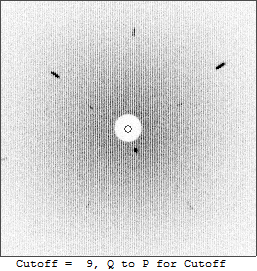
As in step 2, collect an image and find and index the points, but this time click
Store Orientation 2
![]() .
.
Example Images
|
|
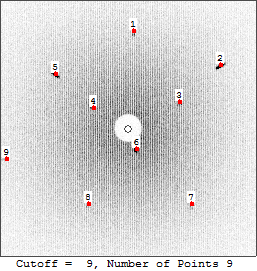
Collected Image of
Boundry Side 2 |
|---|
|
|
9 Diffraction Points
(Laue Spots) Selected |
|---|
|
|
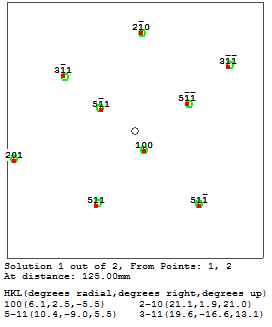
The Selected Points
are Indexed |
|---|
Step 4
Now it's time to see the results!
Click Find Misorientation
![]() .
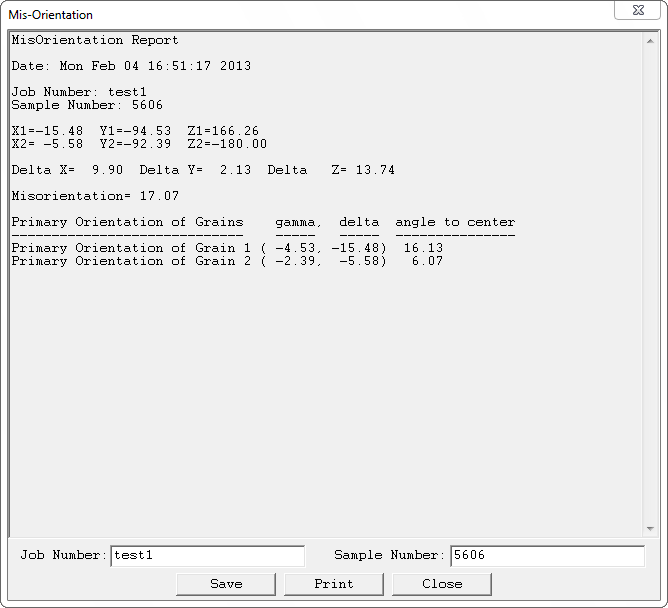
This will generate and display a misorientation report.
.
This will generate and display a misorientation report.
You will find some input fields at the bottom of the report. Here, you may enter a job number and a sample number if you choose. The report can be saved, printed, or simply closed.
Example Report
In this example, the composite angle of misorientation is 17.07°
|
|
The Misorientation Report Window
Showing a Composite Misorientation of 17.07° |
|---|
Two single crystals have zero misorientation if they can be stacked one on top of the other in perfect alignment in their rows of atoms that make up the crystal. If the two crystals are misaligned, then the Misorientation routine accurately determines the three angles of misorientation of the two cubic crystals along 3 orthogonal axes of x, y, and z. The nearby (100) planes of the two crystals are compared by breaking down the angular differences along the three axes as Δx, Δy, and Δz. Then the composite misorientation can be written as:
Misorientation (in degrees) = sqrt(Δx**2 + Δy**2 + Δz**2)
In most cases, the composite misorientation angle needs to be less than some number — for example 14° — for the sample to be an acceptable part. In practice, it takes less than a minute to proceed through the real data collection steps on both sides of a boundary and determine the misorientation!
